Mentors
- Arnav Santosh Nair
- Ameya Deshpande
- Vaibhav Puri
Members
- Gaurang Velingkar
- Srujan Bharadwaj
- Venkata Sravani
- Tilak Madichetti
Demo
Introduction to Kubernetes
Imagine a situation where you have been using Docker for a little while, and have deployed on a few different servers. Your application starts getting massive traffic, and you need to scale up fast; how will you go from 3 servers to 40 servers that you may require? And how will you decide which container should go where? How would you monitor all these containers and make sure they are restarted if they die? This is where Kubernetes comes in.
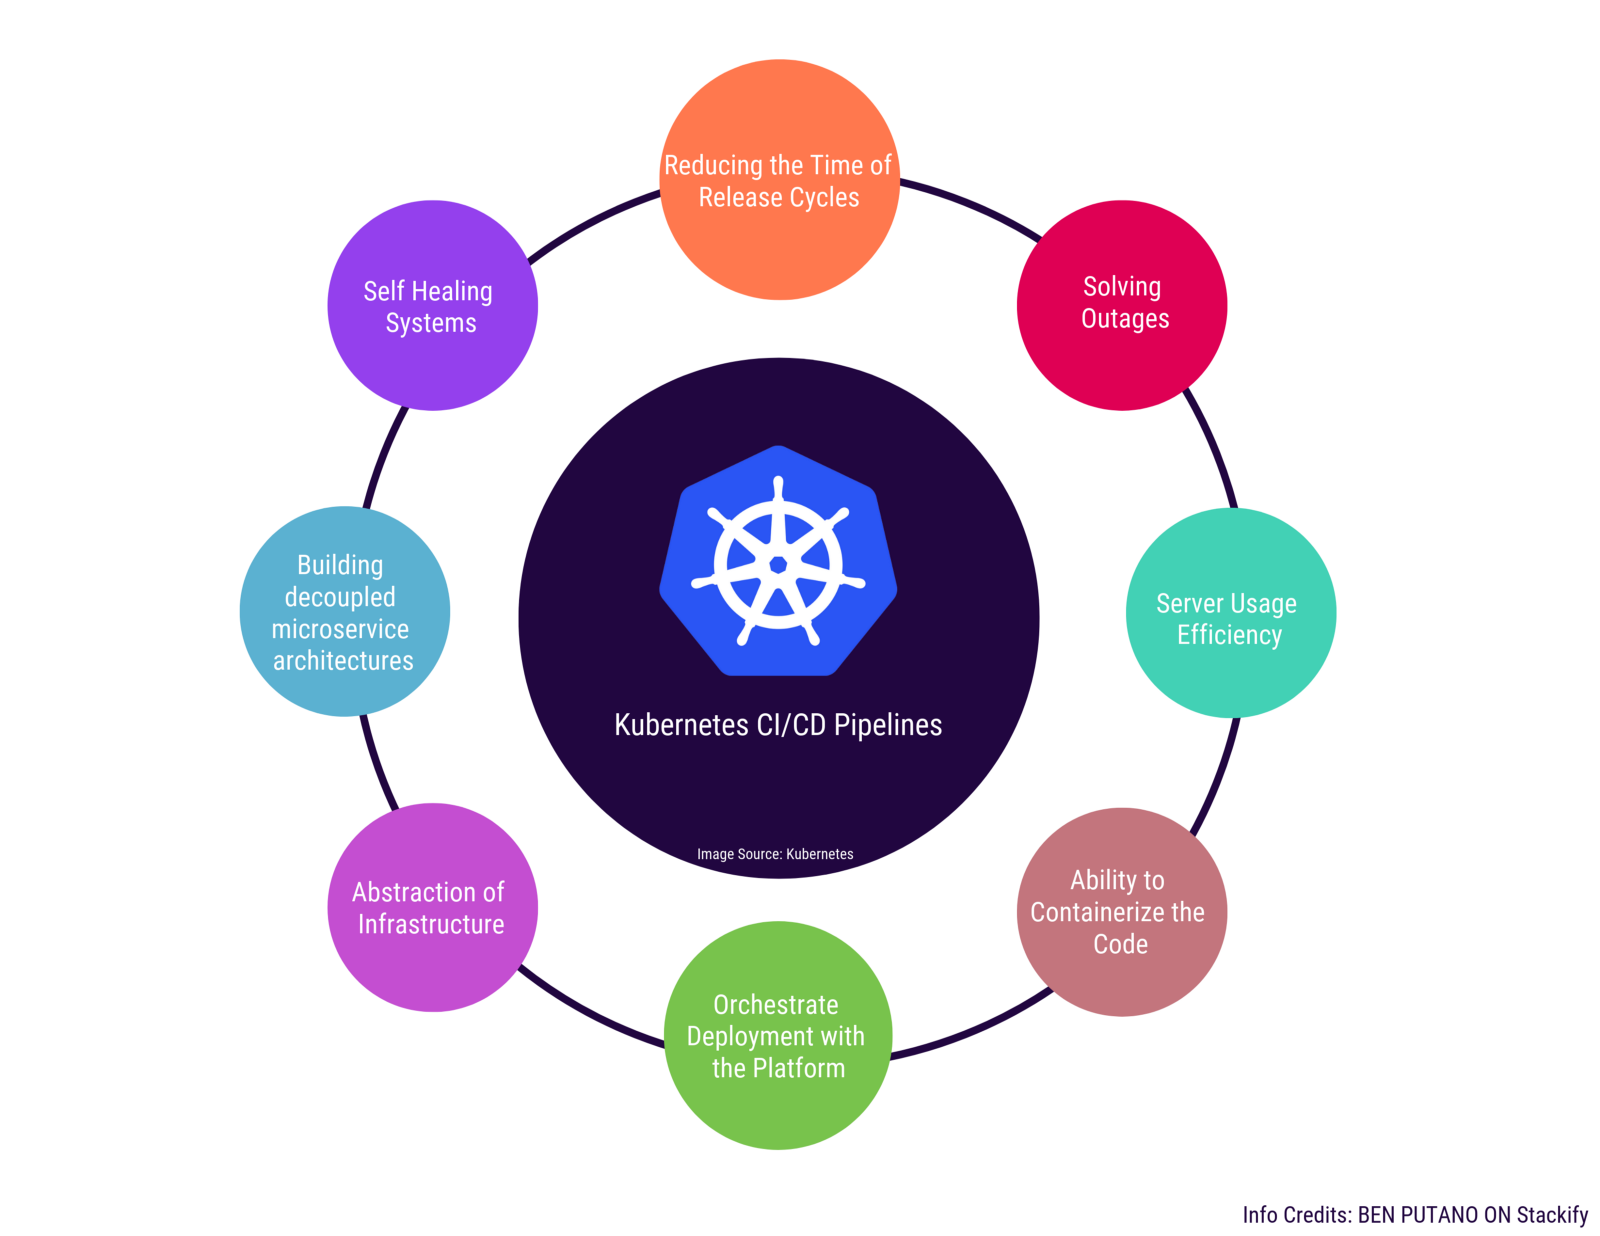
Where do we use Kubernetes?
Kubernetes works with Amazon EC2, Azure Container Service, Rackspace, GCE, IBM Software, and other clouds. Additionally, it works with bare-metal (using something like CoreOS), Docker, and vSphere, and also with libvirt and KVM, which are Linux machines turned into hypervisors (i.e, a platform to run virtual machines).
Companies currently using K8s:
- Tinder
- Airbnb
Why do we use Kubernetes?
Containers are a good way to bundle and run your applications. In a production environment, you need to manage the containers that run the applications and ensure that there is no downtime. For example, if a container goes down, another container needs to start. Wouldn’t it be easier if this behavior was handled by a system?
That’s how Kubernetes comes to the rescue! It takes care of scaling and failover for your application, provides deployment patterns, and more.
Kubernetes Components
The components on the master server work together to accept user requests, determine the best ways to schedule workload containers, authenticate clients and nodes, adjust cluster-wide networking, and manage scaling and health checking responsibilities. We will look at each of the individual components in the master node and try to understand their functionalities.
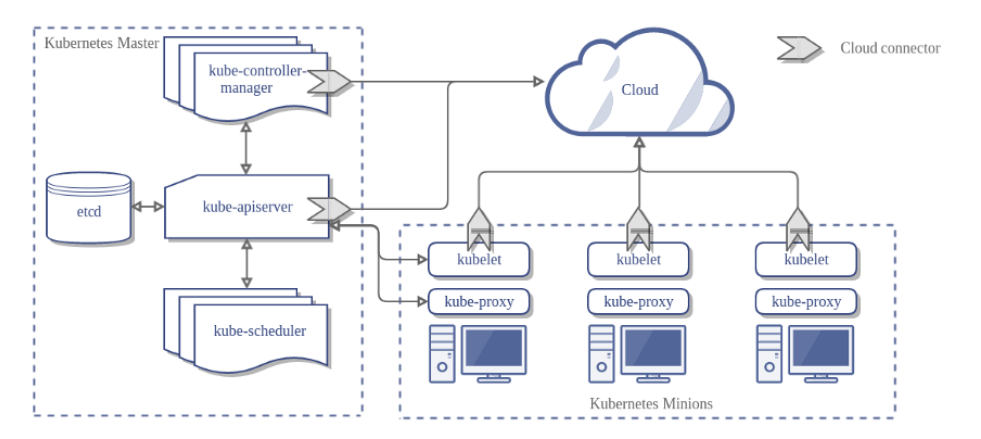
As you can see in the diagram, there are a lot of terms that you might not understand. Let’s see what every component is and does :
Master is the controlling element or brain of the cluster. It has 3 main components in it:
- API Server - The application that serves Kubernetes functionality through a RESTful interface and stores the state of the cluster.
- Scheduler - Scheduler watches API server for new Pod requests. It communicates with Nodes to create new pods and to assign work to nodes while allocating resources or imposing constraints.
- Controller Manager - Component on the master that runs controllers. Includes Node controller(basically checks if desired number of nodes are active), Endpoint Controller, Namespace Controller, etc.
- Worker Nodes - These machines perform the requested, assigned tasks. The Kubernetes master controls them. There are 4 component inside Nodes:
- Pod - All containers will run in a pod. Pods abstract the network and storage away from the underlying containers. Your app will run here.
- Kubelet - Kubectl registering the nodes with the cluster, watches for work assignments from the scheduler, instantiates new Pods, reports back to the master.
- Container Engine - Responsible for managing containers, image pulling, stopping the container, starting the container, destroying the container, etc.
- Kube Proxy - Responsible for forwarding app user requests to the right pod.
We will not be discussing everything in detail here as it is out of the scope of this project. However, you can read more here.
Cluster Networking
In Kubernetes, everything is an API call served by the Kubernetes API Server (kube-apiserver).
First we need to define a few terms before moving forward. Kubernetes dictates the following requirements on any networking implementation:
- all Pods can communicate with all other Pods without using Network Address Translation (NAT).
- all Nodes can communicate with all Pods without NAT.
- the IP that a Pod sees itself as is the same IP that others see it as.
We will discuss how the communication takes place between the following
- Container-to-Container networking
- Pod-to-Pod networking
Container to Container Networking
Communication takes place through network namespace assigned to the pod. They can find each other via localhost since they reside in the same network namespace.
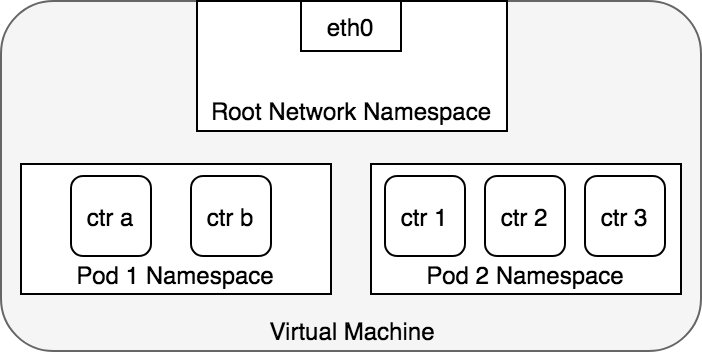
Pod to Pod Networking
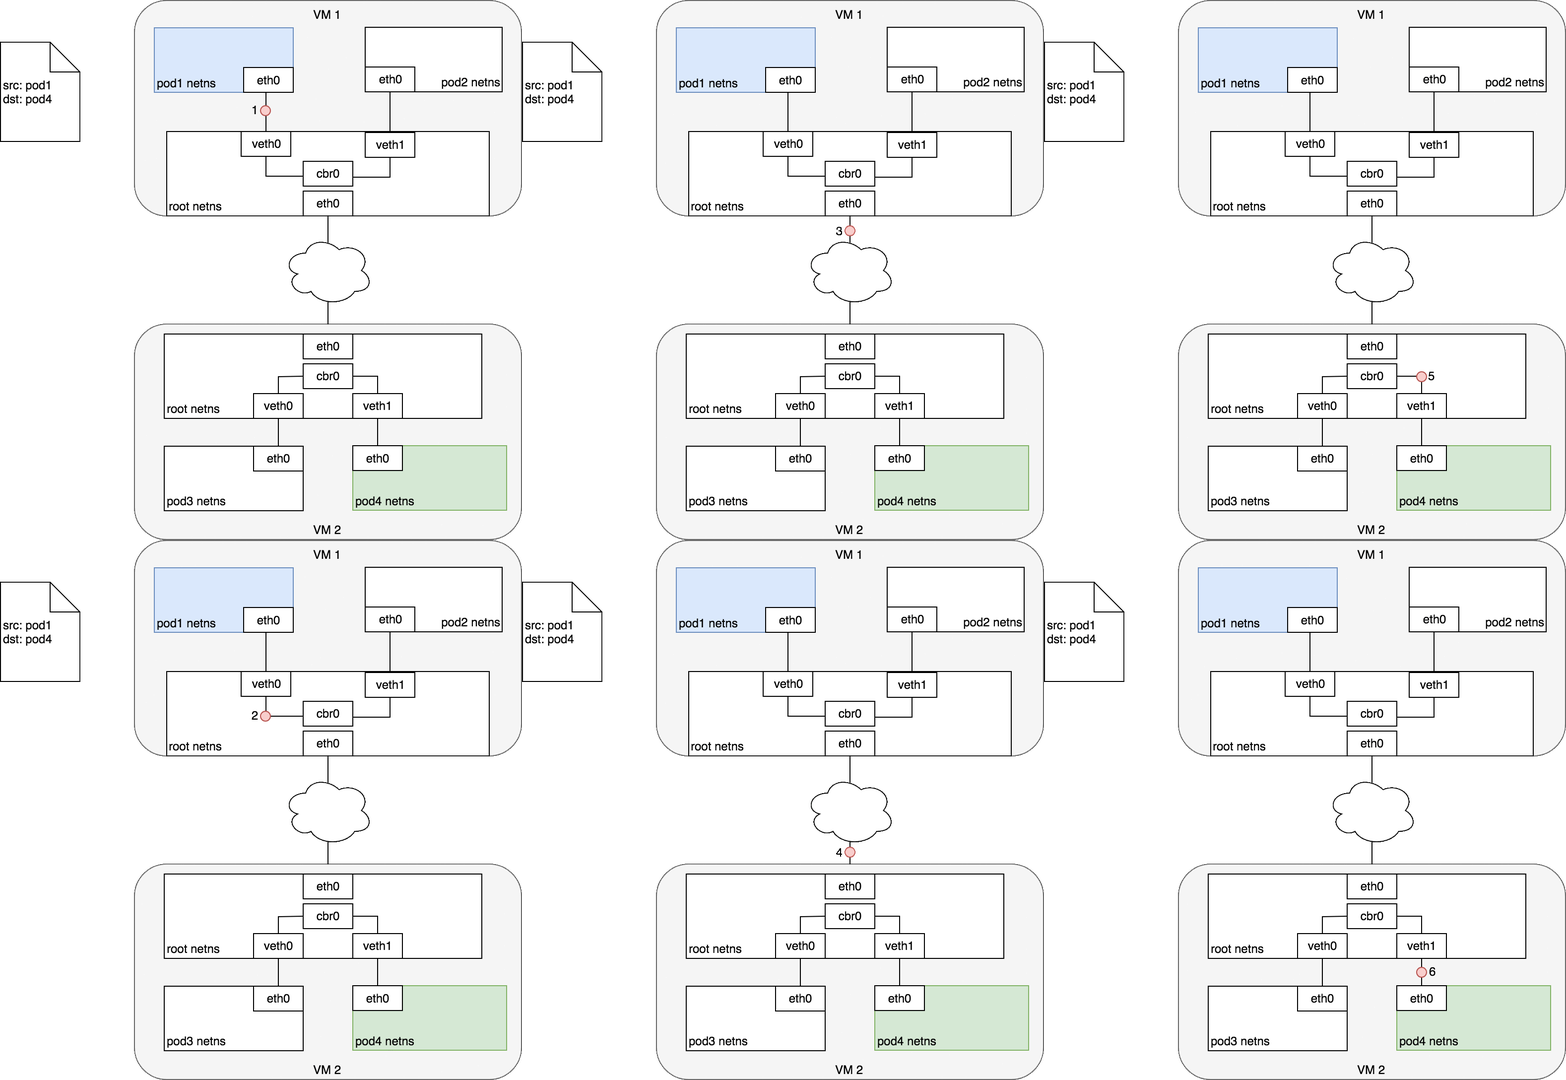
Every Pod has a real IP address and each Pod communicates with other Pods using that IP address. Kubernetes enables Pod-to-Pod communication using real IPs, whether the Pod is deployed on the same physical Node or different Node in the cluster.
Pods on the same machine
Pods which reside on the same node can communicate with the help of the Veth pair.
Namespaces can be connected using a Linux Virtual Ethernet Device or veth pair consisting of two virtual interfaces that can be spread over multiple namespaces. Each veth pair works like a patch cable, connecting the two sides and allowing traffic to flow between them.
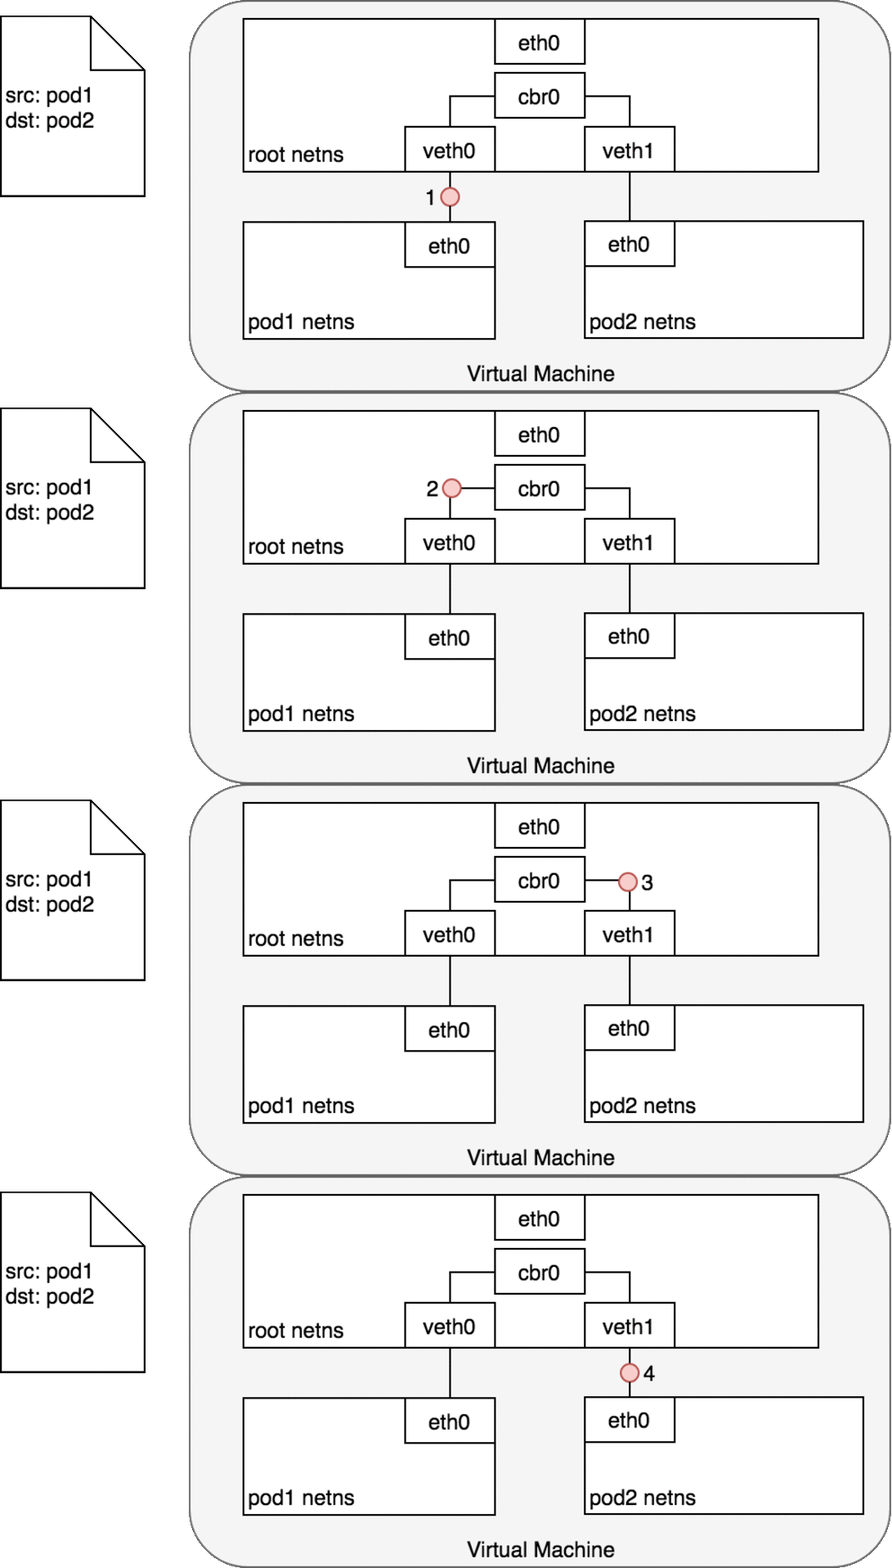
Pods on different machines
Every Node in the cluster is assigned a CIDR block specifying the IP addresses available to Pods running on that Node. Once traffic destined for the CIDR block reaches the Node, it is the Node’s responsibility to forward traffic to the correct Pod. The other communication is the same as the communication between Pods on the same nodes.
Project Overview
The aim of this project was to bootstrap a Kubernetes cluster from scratch so as to fully understand the Kubernetes architecture while also getting hands-on experience of working on the Google Cloud Platform.
To set up Kubernetes on the Google Cloud Platform, we firstly needed the underlying infrastructure that included VMs (or Compute Instances), routing rules, and a bunch of configuration files and certificates along with our own certificate authority for secure communication between various components. We used cfssl for setting up our PKI while kubectl is the tool we will use to control our cluster.
Before configuring our Kubernetes nodes, we provisioned a Certificate Authority to secure communication between various Kubernetes components. Once the CA was provisioned and certificates for the admin user generated, we generated certificates for each worker node that met the Node Authorizer requirements, after which we generated certificates for other Kubernetes components and then distributed them across nodes.
Kubernetes uses kubeconfig files to organize information about clusters, users, namespaces, and authentication mechanisms. The kubectl command-line tool uses kubeconfig files to find the information it needs to choose a cluster and communicate with the API server of a cluster. We therefore generated and distributed kubeconfig files for the controller manager, kubelet, kube-proxy, and scheduler clients and the admin user, following which we also generated encryption config files that would be used by Kubernetes to encrypt secrets.
Once all the configuration files and certificates were ready and distributed, we went about bootstrapping cluster components like etcd and controller nodes. We first bootstrapped etcd on every controller node, and then bootstrapped the Kubernetes Control Plane that includes the API Server, Scheduler and Controller Manager. After this, we configured RBAC permissions to allow the Kubernetes API Server to access the Kubelet API on each worker node and set up a Frontend Load Balancer to front the API Server.
Once the controllers were ready, we installed and configured runc, containerd, certain network-plugins, kubelet and kube-proxy on every worker node. After bootstrapping our worker nodes, we finally configured kubectl for remote access and provisioned network routes. Since pods are highly volatile, we would need consistent domain names for our pods and services instead of IP addresses that constantly keep changing. This was fulfilled by deploying a DNS cluster add-on, backed by CoreDNS. With this, we were done with bootstrapping our Kubernetes cluster.
To make sure our implementation of Kubernetes worked, we deployed a multi-container “TODO” app, and a demo of the same is attached below.
Platform and mode of implementation
We used the Google Cloud Platform for implementation. GCP provides APIs to create, manage and destroy the compute instances which we create in our implementation.
GCP also provides Google Kubernetes engine (GKE) in which bootstraps a Kubernetes cluster with the help of one command. However, the aim of our project was to bootstrap the cluster without using GKE, but understanding everything that GKE does to bootstrap the cluster.
We then installed Google Cloud SDK and configured it in order to access GCP on the local machine. Since Google Cloud Platform has a limit on resource quotas, we scaled our project down to use just two controller nodes and two worker nodes.
The implementation scripts and the documentation can be found on our GitHub.
Conclusion and References
In closing, this project achieved its goals of building and deploying a Kubernetes container orchestration environment from the ground up, and testing it robustly with demo multi-container applications. Additionally, from a learning point, this project provided keen insights into the working components as well as the underlying network infrastructure necessary to bootstrap and maintain such a versatile, dynamic and fault-tolerant system.
Possible future areas of work include understanding more complex Kubernetes features such as Custom Resource Definition(CRD) and Webhooks, and working towards implementing and integrating them into the existing platform.
For interested readers looking to delve further into this project and its concepts, some useful resources include: