A “virtual machine” or “VM” is a virtual computer system. It is a tightly isolated software container with an operating system and application inside. Putting multiple VMs on a single computer enables several operating systems and applications to run on just one physical server, or “host.”
A thin layer of software called a “hypervisor” decouples the virtual machines from the host and dynamically allocates computing resources to each virtual machine as needed.
Introduction
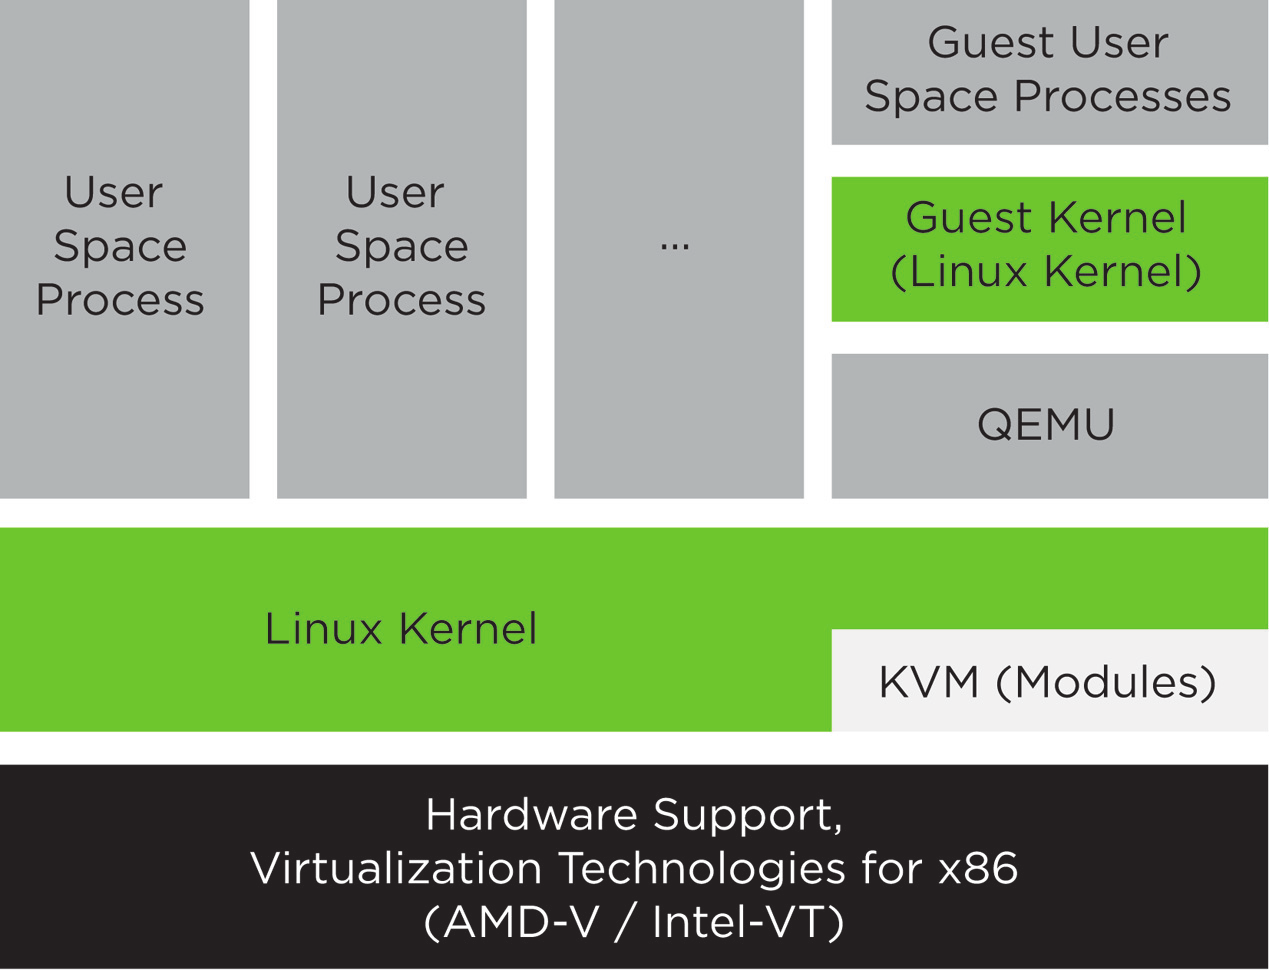
QEMU and KVM
QEMU or Quick Emulator is an open-source machine emulator and virtualizer. It can be used for full-system emulation, user-mode emulation as well as virtualization. We’ll be using the full-system emulation capabilities here.
KVM or Kernel-based Virtual Machine on the other hand is a virtualization infrastructure which turns Linux into a hypervisor. It is part of the Linux kernel mainline since 2007. KVM when activated along with Qemu, speeds up the emulation several times.
To demonstrate QEMU’s capabilities we’ll create a Debian VM (for potential use as a SSH server)
Setting up the environment
Installing QEMU
QEMU is available as a PPA for Ubuntu, which can be downloaded using
$ sudo apt-get install qemu
QEMU isn’t one single program, rather it is a large set of tools and utilities each of which serve a different purposes.
Downloading the iso image
We need a Debian installation image before we can get started with QEMU. A simple wget command can download the image from the Debian’s online repositories.
$ wget https://cdimage.debian.org/debian-cd/current/amd64/iso-cd/debian-9.2.1-amd64-netinst.iso
Creating a virtual hard-disk
The first step in creating the VM is to create storage space to install the operating system on. We’ll create something called a virtual hard drive (VHD). A virtual hard drive is a hard drive image with its own partition table, onto which operating systems can be installed. We can create one using the qemu-img utility which comes bundled with QEMU.
$ qemu-img create -f qcow2 debian.qcow2 6G
The command takes the location and size of the VHD as arguments. The -f option specifies the format for the disk-image as qcow2 - QEMU’s proprietary format - and the last argument is for the size of the disk to be created.
Installing the ISO and Booting Up VM
Installation
To install the Debian iso image onto the virtual hard-drive we just created, we can use the QEMU utility for x86_64 emulation. QEMU provides a variety of commands as qemu-system-{system-architecture} for use with different architectures. We’re here emulating a 64-bit machine and hence make use of the qemu-system-x86_64 command.
$ qemu-system-x86_64 -enable-kvm -hda debian.qcow2 -cdrom ../Downloads/debian-9.1.0-amd64-netinst.iso -net user -net nic -m 4G -boot d
The command takes as input options - most of which are self-explanatory - and boots up the machine from the iso image mounted as a CD drive. From here on the time taken to install depends on the amount of ram allocated and whether the iso needs to download any packages.
Once the install is complete, QEMU reboots automatically. We can then close the window and go back to the terminal.
Booting up
Now to boot up the virtual machine, we use
$ qemu-system-x86_64 -enable-kvm -hda debian.qcow2 -boot c -net user -net nic -m 2G
The -boot c option lets the machine boot up from the hard-drive image.
QEMU also gives us a cool amount of options to tweak our machine to our liking.
Options in QEMU
Using SSH to login to the machine
One way to use the machine in headless mode is to SSH into it using a terminal on our host. For this we need to add -redir tcp:5022::22 to our machine startup command. What this does is that it redirects the port 22 of our guest machine into port 5022 of our host. Thus letting us use the machine via SSH. Another option which comes in use is -display none which tells QEMU not to open up an emulator window, since we don’t need it if we are logging into the machine using SSH. Now, to login using SSH, the usual procedure can be followed on the host machine.
$ ssh -p 5022 <user>@<hostname>
$ <user>@<hostname>'s password:
Where user and hostname are the username and hostname for the machine we created.
To power the machine down, we need to login as root using root’s password, and then type in into the terminal
# poweroff
Sharing Files Between Host and Guest
Viewing host’s files on the guest is one problem that arises quite often while using virtual machines. QEMU solves this by providing an in-built Samba file server. It can be started by adding -smb {shared directory path} to the command for starting the VM. On the guest machine, smbclient needs to be installed in order to access the shared folders. On the guest machine run,
$ apt-get install smbclient
$ smbclient //10.0.2.4/qemu/
$ Enter user's password:
Now we can browse the shared directory. If we need to share files, we can copy them into the shared directory on the host, and then access them through the guest, using smbcleint.
Emulating specific CPUs
While being used for system emulation QEMU can emulate specific CPUs as well. This can be achieved by using the -cpu option. To bring up a list of CPUs QEMU can emulate, use -cpu ?. And then use that CPUs name in the command. Here I emulated an Intel i7.
$ qemu-system-x86_64 -m 4G -hda debian.qcow2 -enable-kvm -cpu Nehalem -net nic -net user -redir tcp:5022::22 -redir tcp:9080::80 -smb ~/c-prog
This can come in especially useful when using the virtual machines for cross-compiling for a specific architecture.
Preventing Cursor Capture
Cursor capture happens when the guest machine prevents the cursor from being used on the host, i.e. the cursor becomes local to the guest machine. To release the cursor, we need to press Alt + Ctrl. Having to do this can be annoying at times. So, we can prevent the cursor from being captured by using the -show-cursor option. This works well when used along with the -enable-kvm option being enables. Enabling KVM speeds up emulation, and hence leads to a lower chance of the cursor being captured. Whereas -show-cursor ensures that the cursor is shown at all times, even if the guest machine doesn’t have a GUI.
Conclusion
We’ve just created a simple VM running Debian. I aim to use it as an isolated environment for programming, and maybe learning a few networking concepts while I’m at it. Qemu is also available on Windows so this VM can be accessed from Windows as well, providing a consistent programming environment regardless of which host OS it’s run on top of. Another interesting use case for QEMU VMs is to build updated Linux images, download and install packages and install an operating system on a SD card for raspberry pi or other such embedded boards so that you can directly get to working on the board without having to worry about network issues and having to connect to a monitor.