Introduction
The I2C bus was developed in the early 1980’s by Philips Semiconductors. Its original purpose was to provide an easy way to connect a CPU to peripheral chips in a TV-set. Its name, Inter-Integrated Circuit, literally explains its purpose: to provide a communication link between Integrated Circuits.
How does it work
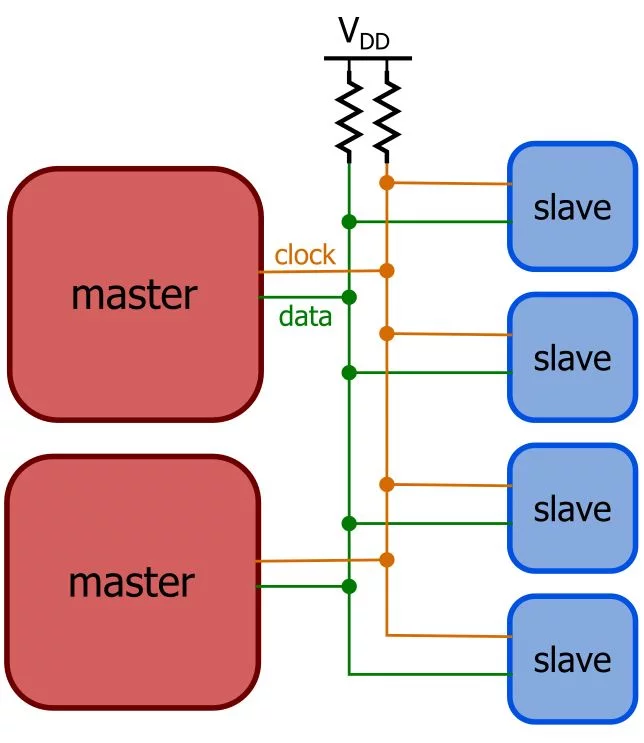
I2C requires two digital lines: Serial Data line (SDA) to transfer data and Serial Clock Line (SCL) to keep the clock. Each slave has a unique 7bit (generally) address in a system so that up to 128 devices can communicate using only two wires. Since the system is synchronous, so data sent will depend on the clock signal.
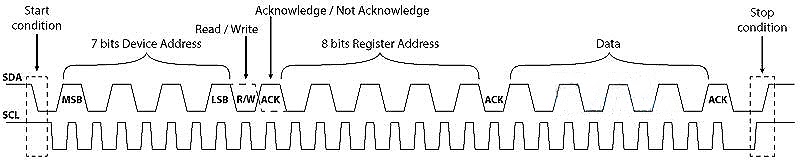
There is a specific condition(or “Start” condition), to initiate communication between master and slave, has to be engaged. After that master sends 8bit sequence which consists of 7bit address of slave from which it needs to communicate and 8th bit to indicate whether master will read from the slave (logic 1) or write to it (logic 0). For the next bit through data, line is sent by slave, which determine that it acknowledged it (logic 0) or not (logic 1). After that, the internal register address of slave memory’s is sent through the data line. This is necessary because of a slave which can be a multivariable storing sensor needs to send a particular value of data which is stored in that internal register. After that, again, there is a requirement for acknowledgement bit. After the whole addressing, data transfer sequence begins, which depends on Reading/Write bit sent just after the slave address. After successful completion of data transfer, stop bit will be sent through the data line and this communication between master and slave will be ceased.
To appreciate the working of protocol here, let us consider a case of communication between multiple independent components. What if the slaves do not know who the master is? What if multiple masters are requesting from the same slave? What happens if a master requests data from a slave that for some reason, has become nonfunctional? In these scenarios, the whole system will collapse within a blink of an eye. It is the principle of I2C which prevents collapse and ensures smooth functioning of the system.
Advantages
- Simple Hardware standard
- Simple protocol standard
- Easy to add/remove functions or devices (hardware and software)
- Simpler PCB: Only two traces required to communicate between devices
- Very convenient for monitoring applications
- Fast enough for all “Human Interfaces” applications
- Displays, Switches, Keyboards
- Control, Alarm systems
Application
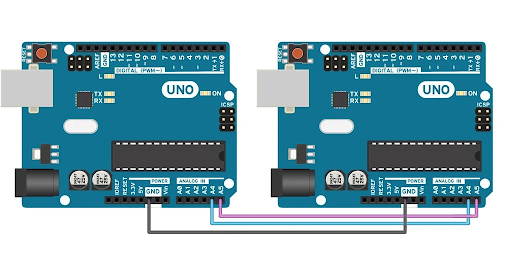
Ok, so that’s it for theory, now let’s see where we can implement it. Let us consider the case of a system which requires lots of pin connection with a microcontroller, which is typically Arduino Uno. So sometimes we need to cascade two Arduinos due to pin shortage or sensor working or whatever the reason. To ensure the working of cascading, I2C comes into the picture.
A4 pin of Arduino Uno board is SDA and A5 is SCL, so we have to connect these pins of one Arduino to another. Also, as per I2C protocol, we need to define one Arduino as master and another one as a slave for which we can use Arduino IDE with ‘wire’ library for I2C.
In the code of master Arduino Uno, there will be Wire.begin() function, which will work as start condition as mentioned earlier. Now for selecting a slave device, there is function Wire.beginTransmission(X), in which X is the address of slave, which will begin transmission with slave. Wire.write() is used for writing data to slave memory and Wire.read() is used for reading values from slave. Wire.endTransmission() will behave as stop condition to cease communication till next time.
In the code of slave Arduino Uno, similarly, there will be Wire.begin(X) where X would be the address of it. read() and write() can be used whenever there is a need to read or write data through the data line. onReceive() and onRequest() functions are used by the slave to specify a new function that is called when whether master sent data or master requested data.
//Demonstration of wire library
// Master arduino as reader
#include <Wire.h>
void setup()
{
  Wire.begin();        // join i2c bus
  Serial.begin(9600);
}
void loop()
{
  Wire.requestFrom(3, 8);    // request 8 bytes from slave device #3
  while(Wire.available())
  {
    char c = Wire.read(); // receive a byte as character
    Serial.print(c);
  }
  delay(500);
}
// Slave arduino as receiver
#include <Wire.h>
void setup()
{
  Wire.begin(3);                // join i2c bus with address #3
  Wire.onReceive(receiveEvent); // register event
  Serial.begin(9600);
}
void loop()
{
  delay(100);
}
void receiveEvent(int howMany)
{
  while(1 < Wire.available())
  {
    char c = Wire.read(); // receive byte as a character
    Serial.print(c);
  }
  int x = Wire.read();    // receive byte as an integer
  Serial.println(x);
}
Resources and Going Further
- Wikipedia Article on I2C - Not great, but not a terrible place to start.
- Standards Doc - Phillips Semiconductor became NXP a few years back; this is the official standards doc for IC.
- I2C primer - The official primer on I2C and related technologies.