How to get Started with bots
Have you ever been fascinated by robots - Awestrucking objects which are capable of performing some cool tasks without needing a human intervention (well, unless they decide to go mad! :P) ? And certainly the thought of how these genius creations work and can I make one too? must have crossed your mind. Being in a similar frame of mind couple of years back and having made some basic bots, I thought of writing this article to help the curious people.
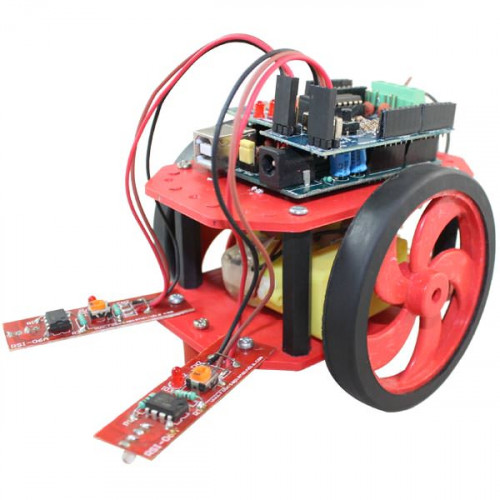
Getting Stuff together
It’s surely hard to shell out a few bucks but it’s all worth here. First and foremost you will need a microcontroller. To the beginners out there with no previous experiences with one I will recommend to use Arduino Uno but if you already had enough of Arduino go with MSP430(you will certainly learn more here) from TI. Then comes the robot chassis: buy one which is not too small and strong enough. You will need two DC motors, two wheels, one castor wheel. Also L293d - a motor driver (It is an IC if you didn’t know) which is required to provide extra current to motors. Apart from this you will need a breadboard along with few LEDs and 330Ohm resistors(for testing), jumper wires (M2M, M2F, F2F), sensor components(I will come to these later) and also I highly recommend having a multimeter handy. Lastly a power source: a few 9V batteries ( they drain quickly, you can try rechargable ones) and if you don’t mind shelling out more, buy 12V lead acid battery which are much better than your 9V ones.
Where do I buy these? If you are in Bangalore, head to SP road, Lamington road for Mumbaikars ( I am unaware of other cities). You can also buy it online on robocraze.com, robokits.co.in, amazon.in and many other sites.
Try catching hold of your friend with similar interests and spilt the bill.
Once done with testing on breadboard, people generally prefer to make it permanent by soldering it onto a board which will require a soldering iron.
Start Building
I believe you are well-versed with Basic C programming and that is enough to get started. Install Arduino IDE and learn basic GPIO functions of Arduino and test them out with LEDs ( use resistor in series to prevent your LED from burning) and breadboards. Go through the example codes in Arduino IDE ( Arduino’s website is the best place for answers to your doubts). Next learn to use the motor driver (here you will have to use your batteries). This article will help you.
Integrating the Sensor
IR sensors are the most basic and versatile sensors. They can be used to tell black lines apart from white, measure the distance in analog and digital form, detect obstacle among many others. Refer this article which does a very good job of explaining it. You can build a line-following, wall-following,etc with IR sensor.
There are many other interesting sensors like light-sensing, then accelerometers, gyro, etc which detect the movement of the robot which you can experiment with once you are done with your first one.
And if you want your robot to have arms then servo/stepper motor is the answer.
You are almost there
Once you have tested your sensor and motor circuits individually, it’s time to bring them together. Write a code ( I leave this to you) which will process the sensor data and intruct the motors. You can improve the efficiency of your code using algorithms like PID. Then fix your motors, castor wheel to the chassis. Attach your sensors at the required place.Finally rest your Arduino and sensors on top of the chassis along with the battery and you are ready to go.
What’s next?
After you build these basic robots, you should try and procure data in other forms like images of surroundings, noises,etc and process them using image/audio processing techniques. Send data to and fro using bluetooth, WiFi. You can perform certain tasks with your robot by including a robotic arm controlled by a stepper/servo motor. Further improvisation is endless and your imagination is the only limit.
Useful Tips
- Make sure all your modules share a common ground.
- Always have a switch for your robot.
- Disconnect wires from pins 0 and 1 on Arduino while uploading code.
- Have a provision to use variable speed for motors
- Try making your circuit permanent by soldering to avoid lose connections.
- Never lose hope and keep building!!