Git is a distributed version control system. It means Git helps you manage different versions of your work, record the changes and helps different collaborators work parallelly on the same project.
Imagine that you are working on a big project involving many files and folders in it. You make a series of changes to your project and now finally when you compile it, you see the application is crashing or not working as expected. In such a case, Git is the best tool you could use. If you have recorded all your changes uniformly in Git, you can any time refer to those versions. Alternately, you can create a copy of your work at the beginning itself, and start working over it and if the changes work out correctly, you can try to merge them with your original project.
This blog mainly covers the following content:
Git Core:
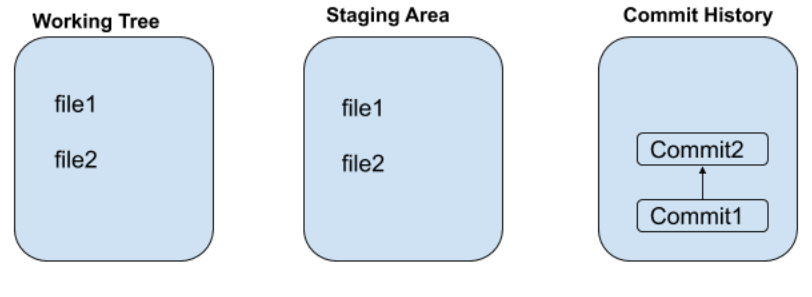
In a Git repository/folder, we have three three logical areas, namely:
- Working Tree
- Staging Area
- Commmit History
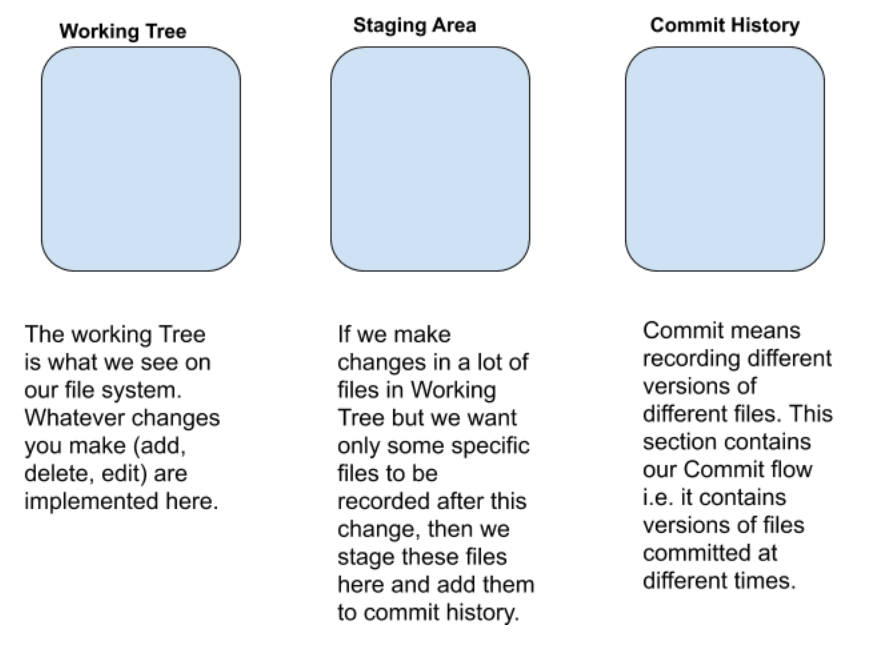
For more clarity on commit, consider taking snapshots of your staged changes.
Till now, you might be wondering where is all this information getting stored? A Git repository is initialised with an empty .git folder which contains information regarding commits, branches, config and many more. We’ll see a few of these below.
Let’s play with Git and try to understand its features:
Note: I will be using command-line Git. I suggest installing any linux system before proceeding and learning basic bash commands. You can refer this for ubuntu installation and this for getting started with basic bash commands.
Install Git on your system using
sudo apt-get install git
Make a new directory git_test and initialize it with Git using
git init
It will create .git folder.

Now, we have to configure the user.name and user.email. Whenever we commit our staged changes, Git includes this name, email and time of commit along with it. This is important to check who made these changes and when.
git config --global user.name <your-name>
git config --global user.email <your-email>
To check the configuration, type git config --list.
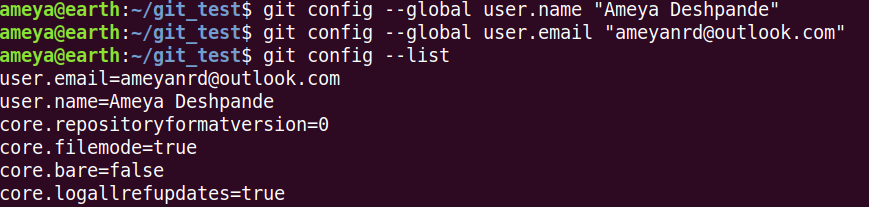
Here, we used --global flag, so this configuration will be reflected to all the Git repositories on your machine. This configuration is stored in your home directory. Type cat ~/.gitconfig to check.
If you use --local flag instead, this configuration will be limited to your current repo. This is stored in .git directory. Type cat .git/config in git_test folder.
Now, we create a file say file1 and “Hello World!” to it.
Type the following commands and observe:
git status
git add file1
git status
![]()
When we created file1 and made changes to it, these changes were present only in the Working Tree i.e. they are not staged/tracked.
git add command staged these changes i.e.added them to the Staging Area for committing them further.
Now, we commit these changes.
git commit -m "First line added to file1"
-m option helps us to add a small message along with the comment. This message should be clear enough so that we can refer to this commit in future if required.
Now, type git status again and observe.
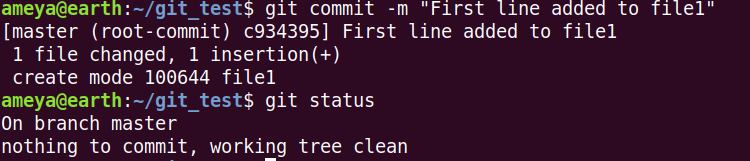
We can see a seven digit hexadecimal number above (c934395). Whenever we commit our changes, Git hashes these changes to a 40 digit hexadecimal number. The figure above is the first seven digits of 40 digits.
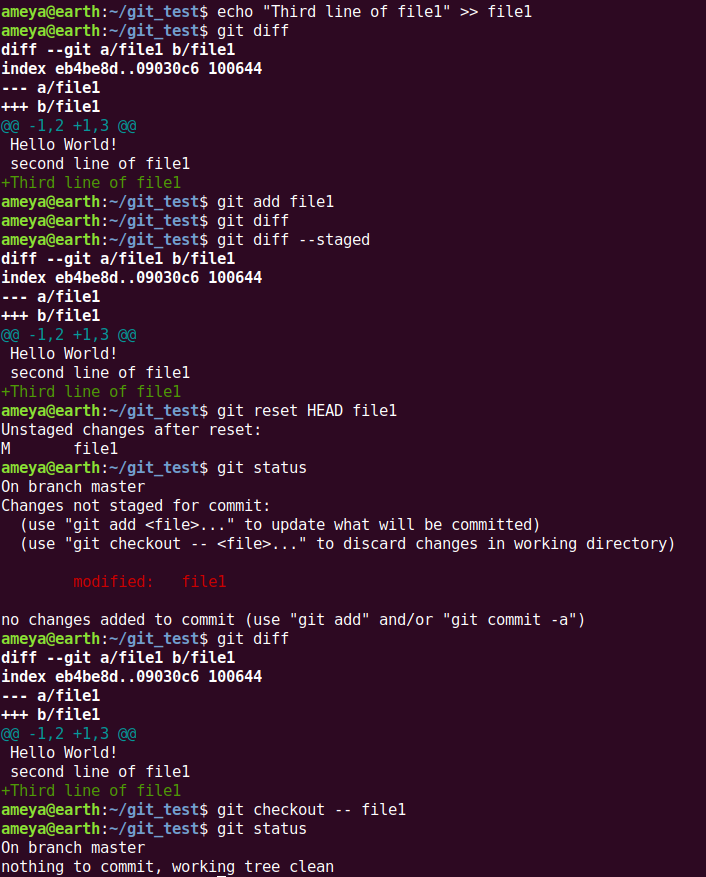
Now, see the following operations:
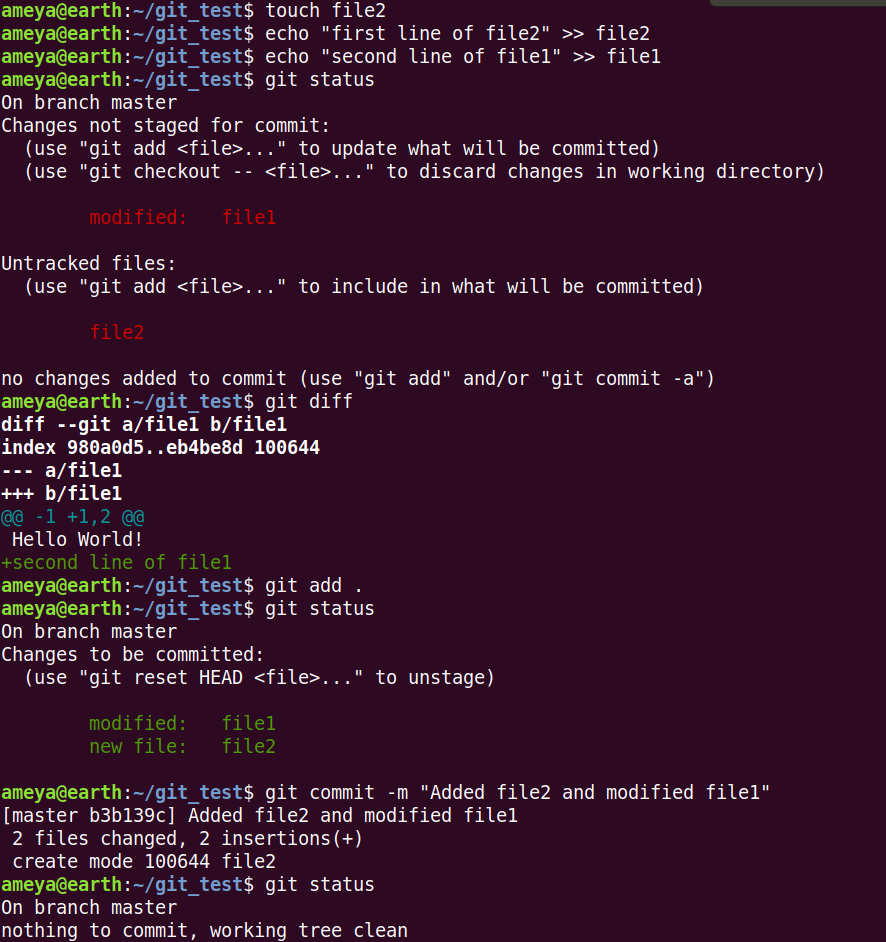
Note the output of first git status above and compare with the previous outputs we got.
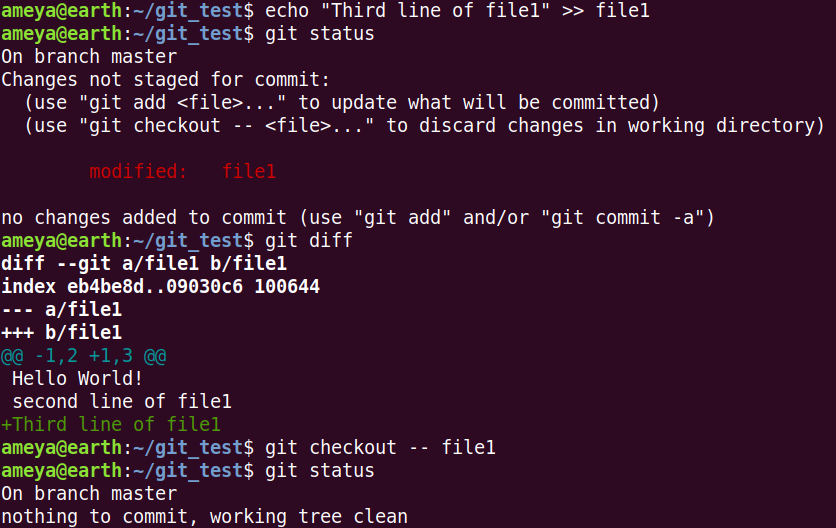
git diff helps us to check the differences between working tree and the corresponding staged file. Note that file2 is not staged at this point, so git diff won’t give any output for it.
If we use git diff --staged, we can get the changes between the staged files and most recent commit files (Try it before using git commit).This will also show the newly staged files not committed before.
In git add ., . refers to all the new and modified files within the directory.
To check your commits till now, type
git log
Same can be checked in .git/log/HEAD file.
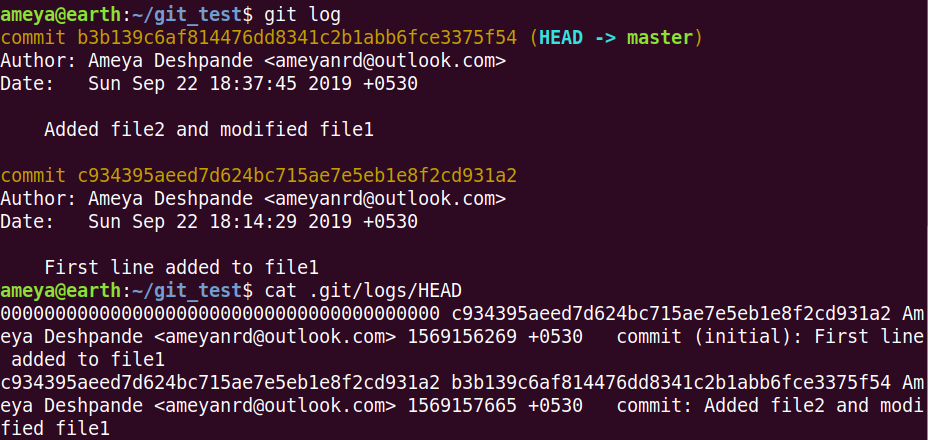
Here HEAD nothing but a pointer pointing to the default master branch.
If we use git log -p, we can see all the changes in each commit compared to its previous commit.
To give a picture of what happened till now, refer below
Now, say you want to remove a file2 from Git. So how would you do it?
Approach 1:
rm file2
git add .
Approach 2: git rm file2
This will not only remove file2 from Working Directory, but also from Staging Area. Type git status and observe output.
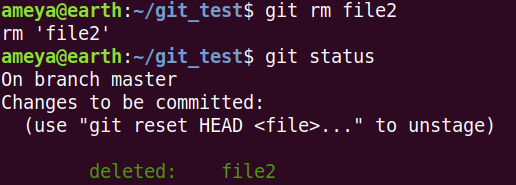
Commit these changes. Moving on…
Say you have made some changes to a file in the working tree and you want to recover the earlier file version, so what is the way out?
Let’s say a line added to file1. Now this change is untracked in the Staging Area. But we have the previously staged file1 in Staging Area.
So we recover this file1 to our file system using
git checkout -- file1
Now, say we added changes to the Working Tree (in file1) and Staged these changes. We want to recover previously staged file1 (which was committed).
How will we achieve it?
Tip: Try to think in terms of the logical areas of Git and understand the flow of the commands in the above picture.
How to restore changes from a previous commit?
In the context of our example, we will try to recover the file2. Type
git log -- file2
This shows a list of commit that affect file2.
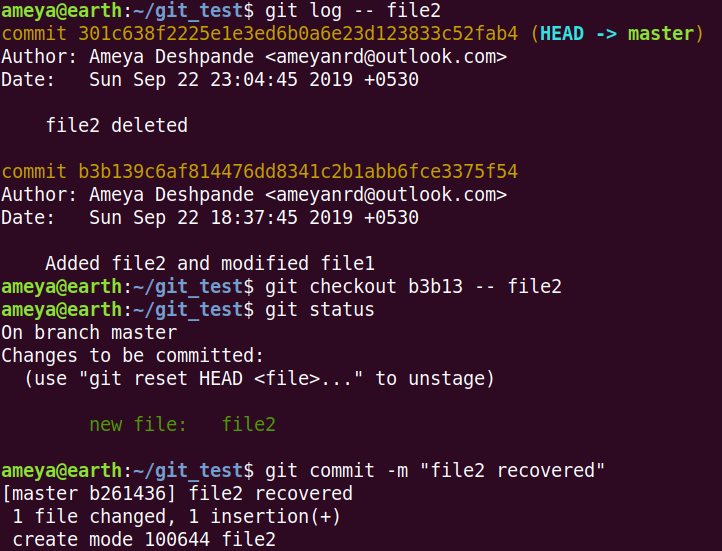
git checkout <first_five_hash_num> -- file2 can be used to restore changes of file2 from that commit (In this case, restoring the file itself).
git status indicates that it changes the Working Tree as well Staging Area. Later we just commit these changes.
Sometimes we don’t want Git to pay attention to a few files or folders. It means we don’t want to check the changes made to these files.
For achieving this, Git has .gitignore file as a way out.
We create some files with .ab extension, say file1.ab, file2.ab and file3.ab. Also, we create a folder say trash which includes some expired or not required stuff.
We don’t want to track either of them. So we implement the following
vi .gitignore
In the vi editor, append these lines
*.ab
trash/
Try running
git statusbefore and after adding the above lines in.gitignoreand observe the output.
Task: We know that
.gitdirectory is the main directory recording all Git related information. Now make a new directory and copy your.gitdirectory fromgit_testto this new folder and try to retrieve that data in this directory.
Git Branching and Merging:
Branching in Git enables developers to work on multiple versions of their work and merge the stable version with the master branch.
Master branch is the the default branch created by Git.
A branch is nothing but a pointer to a commit. Using different pointers (i.e. branches) leads to different commits. We will take an example and try to visualize it.
To visualise your Commit History graphically, we’ll use
git log --graph --online --all
Check the flags used above, using
git log --help.
Also, if possible create an alias of this command. Here is a reference for it. I will creategraphas my alias.
We create a new directory name git_test and initialise it as Git Repo. Further we create two files file1, and file2 and edit them.
Look at the below picture and observe.
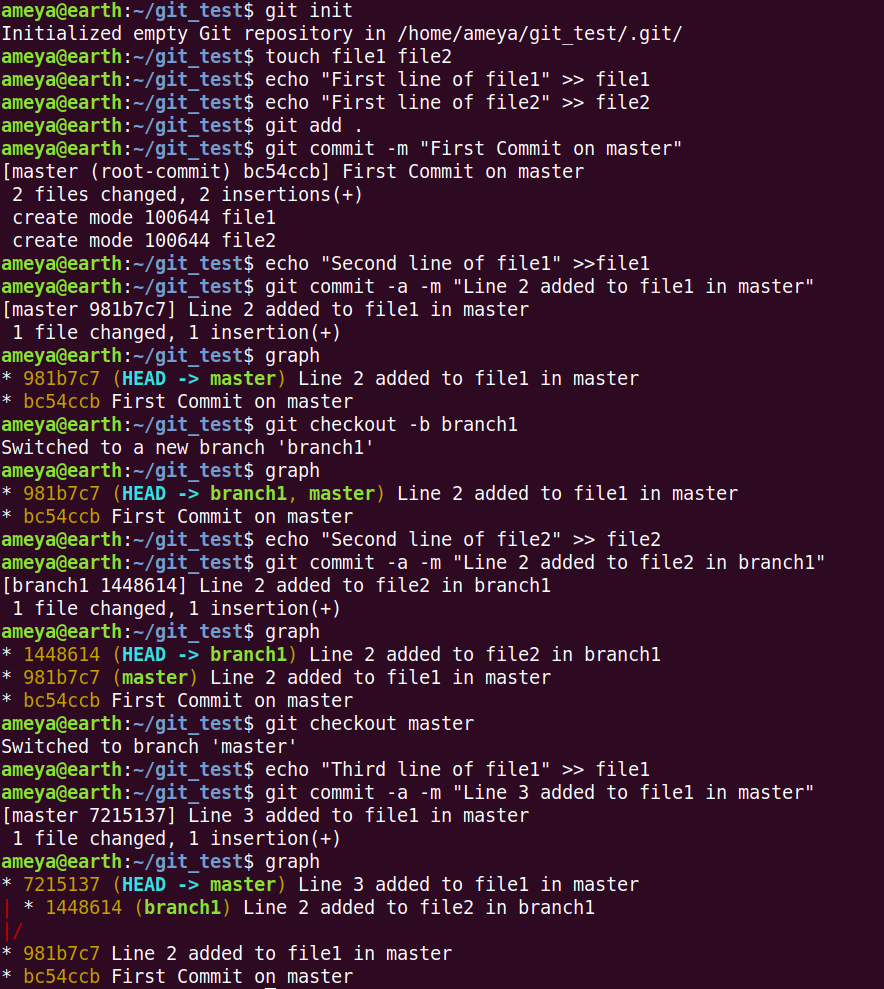
Once the files are staged before, later staging their changes and committing can be performed in a single line using
git commit -a -m <message>
After the second commit on master branch, we can see that master is pointing to the commit 981b7c7. It points to the latest commit till now.
git checkout -b branch1 creates a branch with name as branch1, and the current branch is switched to branch1 and we can see that it points to the same commit.
Also, we see that HEAD is pointing to branch1. HEAD indicates the current branch on which we are working.
git checkout <branch_name> helps to switch to that branch.
Try to understand the flow of commands and relate it with it’s
graphin the above picture.
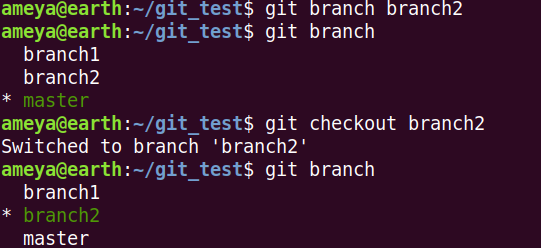
We can also create a branch using git branch <branch_name>, but it won’t automatically switch it to that branch. You will have to do git checkout <branch_name>
If you type git branch, you can see all the branches and the branch where HEAD is pointing.
Task: Switch to different branches and edit diferent files. You will see that changes in one branch do not affect the changes in other. Think how it may be useful?
What happens when we try to switch to another branch without committing to its changes in the current branch?
Look at the picture below
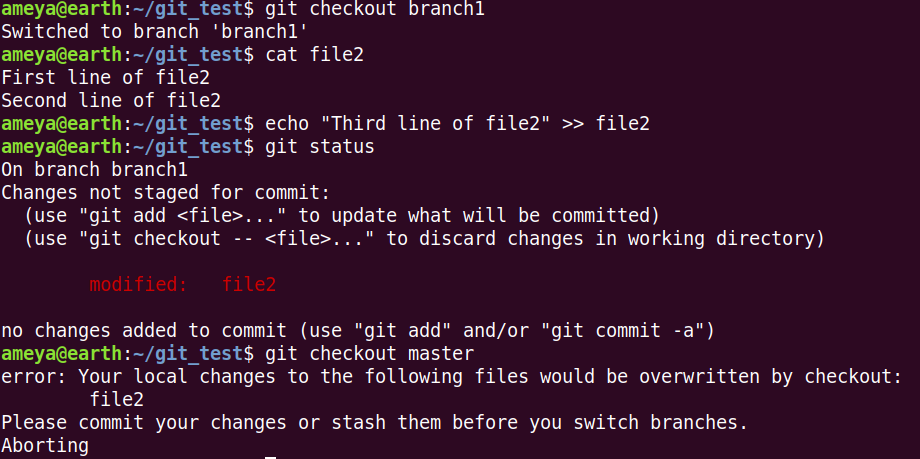
Git suggests you a way out. It tells you either commit your changes or Stash them. The latter one is used when you don’t want commit your changes but quickly change to a different branch temporarily.
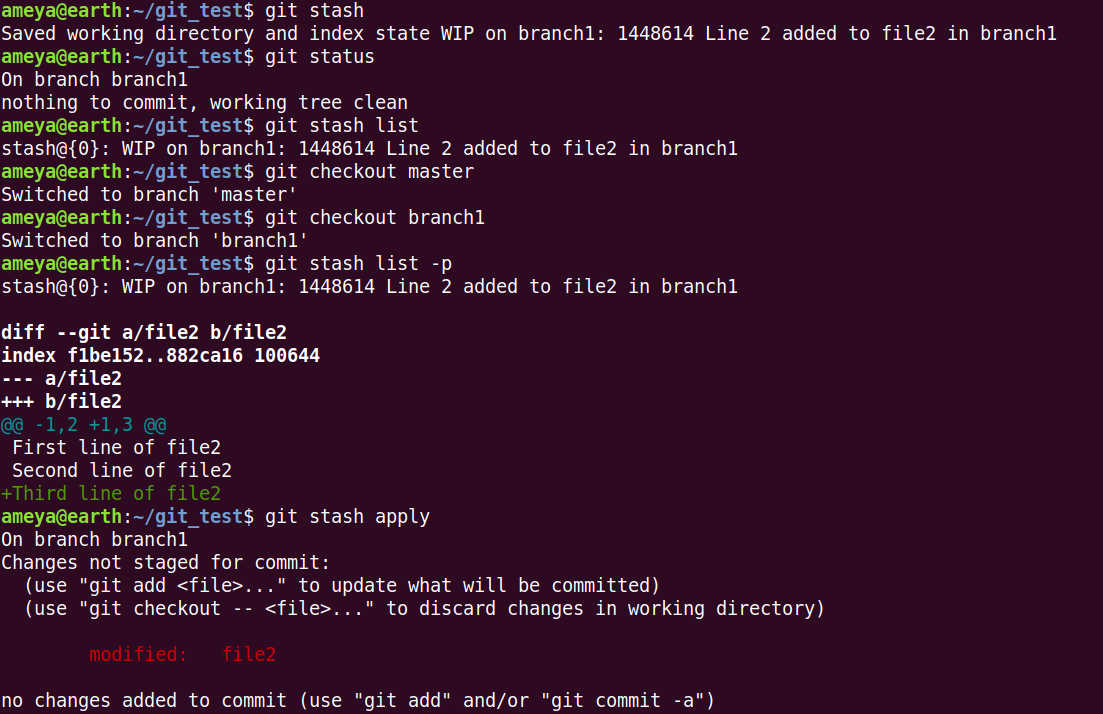
git stash can be used to stash our changes.
git stash save <message> can be used to save stash with a message.
git stash list shows a list of stashes. -p option helps to check the changes.
git stash apply applies the recent stash.
git stash apply stash@{2} helps us to apply any particular stash (In this case stash@{2}).
git stash pop pops the recent stash and also applies it.
Task:
- Try to search where are the stashes stored in
.gitfolder.- Try to search where are the details regarding branch commits and head pointer stored.
Moving on to Merging branches...
Now, say you have created a branch, made changes to it, and finally you want to add all these changes to your master branch copy.
Here it is required to merge two or more branches.
There are two types of merging techniques:
Fast-Forward3-Way
We continue with our above situation. Look at the picture given below:
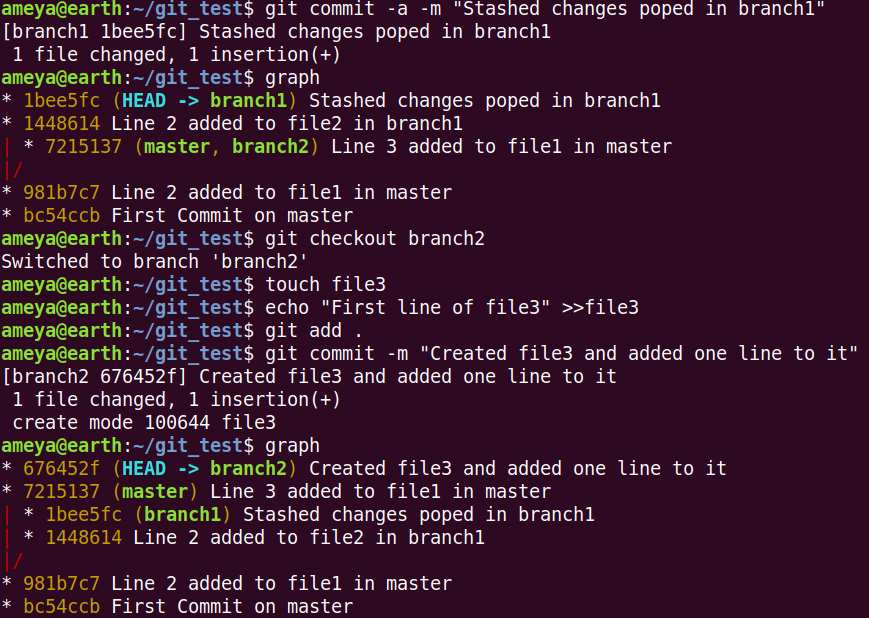
We created a new file3 in branch2 and committed the changes.
From the final graph, we observe that there is a direct path between master and branch2. But there is no direct path between master and branch1 (We will have to pass through their first common ancestor i.e.981b7c7 to create a path between them).
Say we want to merge branch2 and master. Since there is a direct path, we perform the Fast-Forward Merge.
Merging master with branch2 is equivalent to moving master branch to branch2. Check the diagram below.
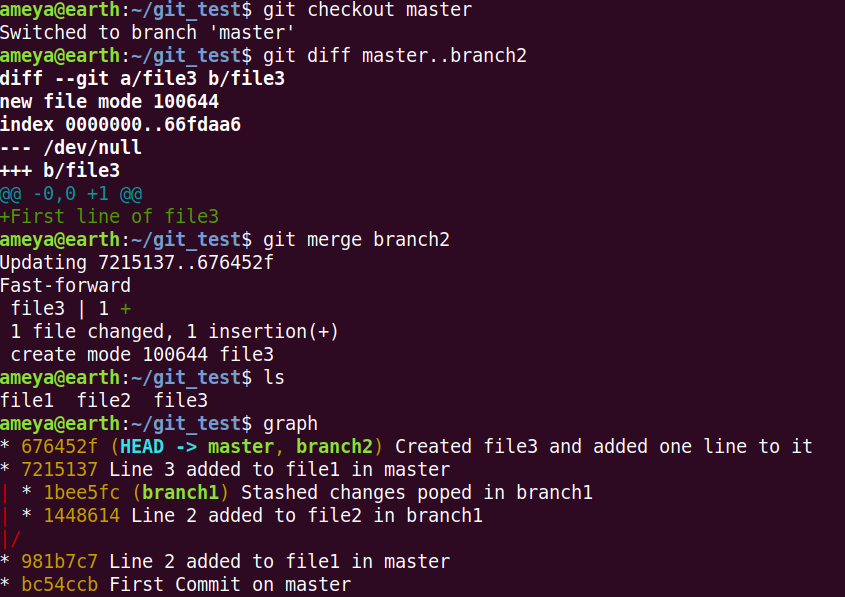
First the checkout master branch anad later perform
git merge branch2
This updated master branch to branch2 changes.
Note: The direct path can be however long as possible. Fast-Forward Merge will take place as long as there is a direct path.
Now we can delete the branch2 branch as it is no longer required.
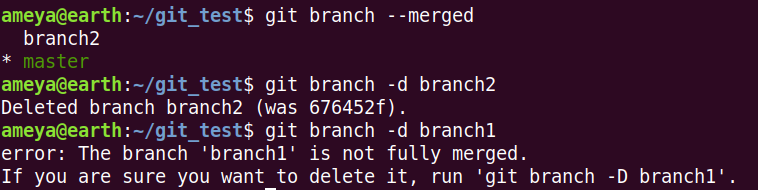
git branch --merged can be used to check branches merged with the current branch.
git branch -d branch2 can be used delete the merged branches.
When we try to delete a non-merged branch -d gives an error and blocks it. But if you use -D instead, any non-merged branch can be deleted.
Now, we have the following configuration and we want to merge master and branch1. How will we do it?
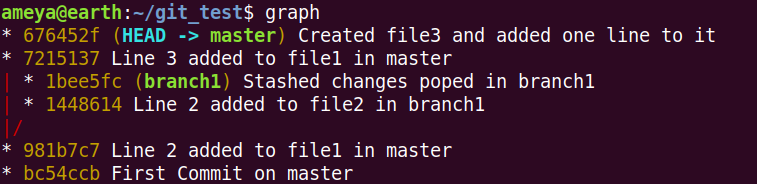
Fast-Forward merge cannot be performed as there is no direct path.
Here we have to perform the 3-Way Merge. Look at the picture below to understand it.
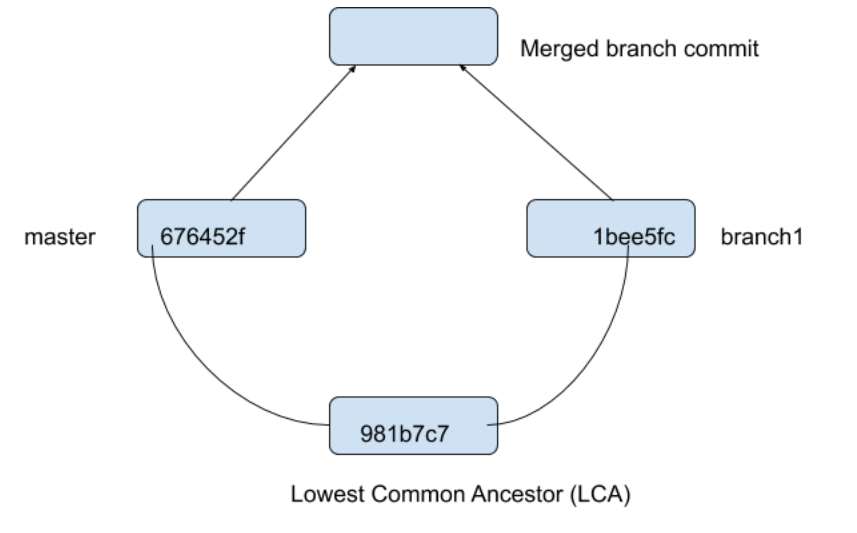
This technique checks the changes in the commits pointed by master and branch1 with their LCA and reflect the changes in the newly merged commit (pointed by both the branches).
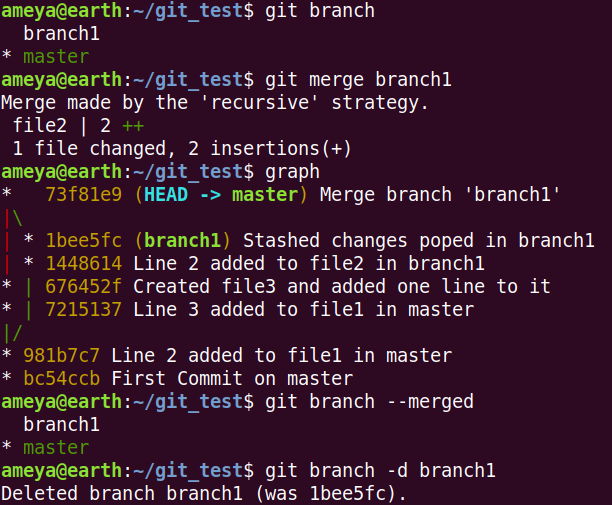
git merge branch1 will open the dafault editor in your system for editing the message. Edit the message or keep it as it is and exit.
The master branch will point to this new commit.
Till now, whatever merges we performed, we didn’t encounter any Merge Conflicts.
Merge Conflicts occur when we try to merge two branches that have changed the same lines in the same file with respect to the LCA.
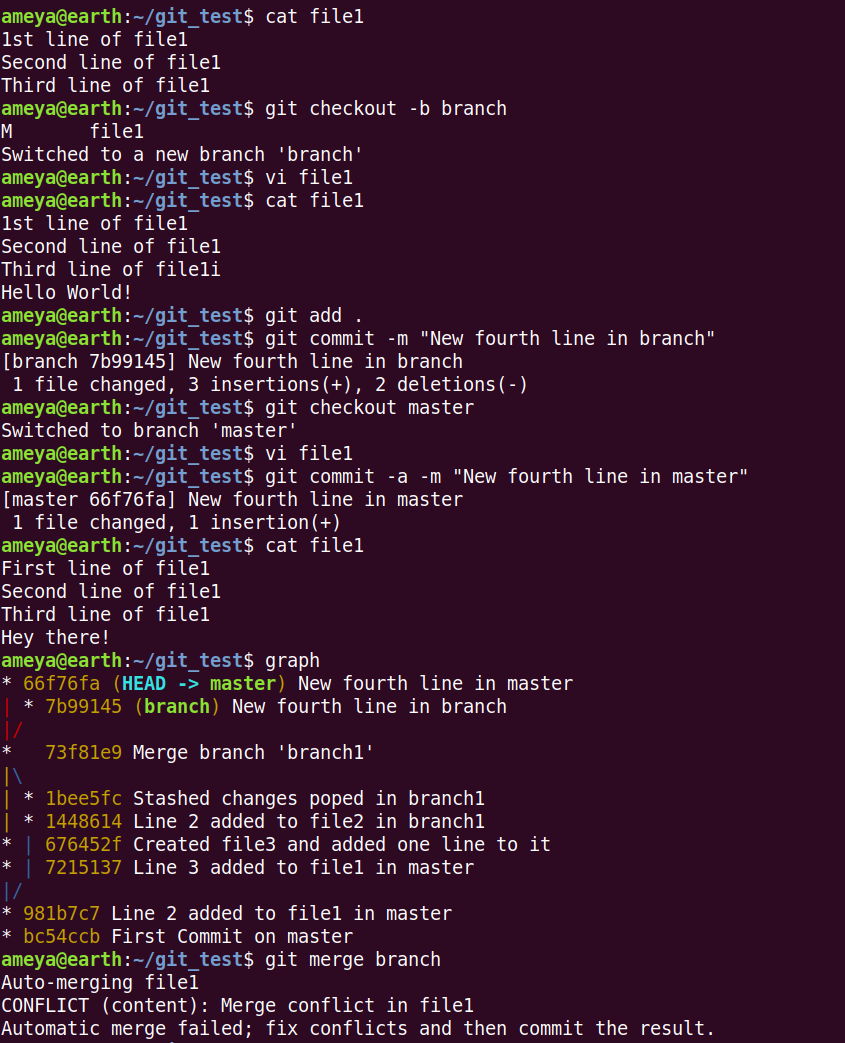
Initially, there is no fourth line or empty fourth line (in LCA). Later both master and branch have different fourth lines. This puts Git into a conflict which line to choose.
If one of branch’s line had matched the line of LCA, the merged commit would have had the branch’s line (Changed line has higher priority).
See the file1 contents.

======= indicates that both changed lines have same priority.
Also HEAD and branch show the lines in their respective branches (HEAD points master).
Observe the below picture

git status gives us that merging process has not stopped yet and the conflict exists.
There are two methods to resolve it:
- Either abort the merging process by
git merge --abort - Or open the file and manually select the lines you want finally in file1. Later stage and commit your changes.
Later we removebranch.
Finally, we move on to our last topic under the heading i.e. DETACHED HEAD.
Normally, HEAD points to a branch which in turn points to a commit. If we use git checkout with a commit, the HEAD goes into detached state.
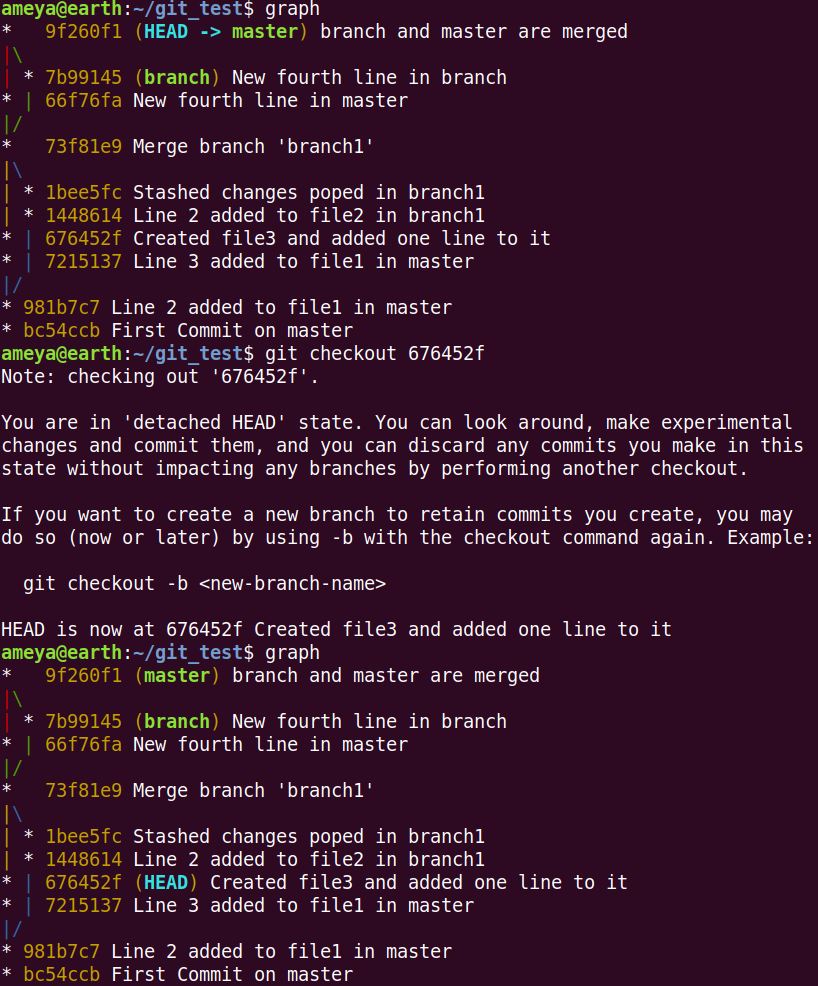
There are two ways to get out of it:
- Checkout a branch in your Git repo.
- Create a new branch. It will automatically point to this commit(Detached Head Commit). Now checkout this branch.
Git Remotes:
Remote in Git is nothing but a repository in another location w.r.t your current location. This another location can be GitHub repo, fork of GitHub repo, a repo on your machine itself or a repo on any other Git Server.
GitHub is like a cloud where projects can be hosted. Different people can collaborate on a single project hosted on GitHub. It equipped with Git utilities.
Note: GitHub is a Git Server. Similarly, there are many such servers available to share your code. In fact, you can also establish your own local Git Server. Here is a link for it.
This blog won’t be covering usage of GitHub. So use this link for GitHub reference.
Now, make a repository on your GitHub account (say git_test). If you initialize this repo with README.md, GitHub will automatically create a first commit which includes this file. Now we want to work on this file on our local system. So how do we make a copy of it on our machine?
We use git clone command followed by the ssh or https link provided by GitHub. For using ssh protocol, use will have to set the public key in GitHub. Use the above GitHub reference for it. This blog will be using https protocol.
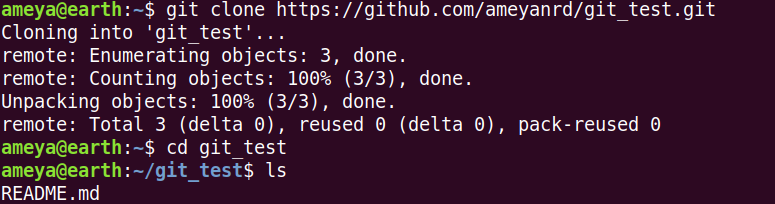
If your Git configuration is not set globally, set your configuration (either locally or globally as you wish).
Check the following picture:
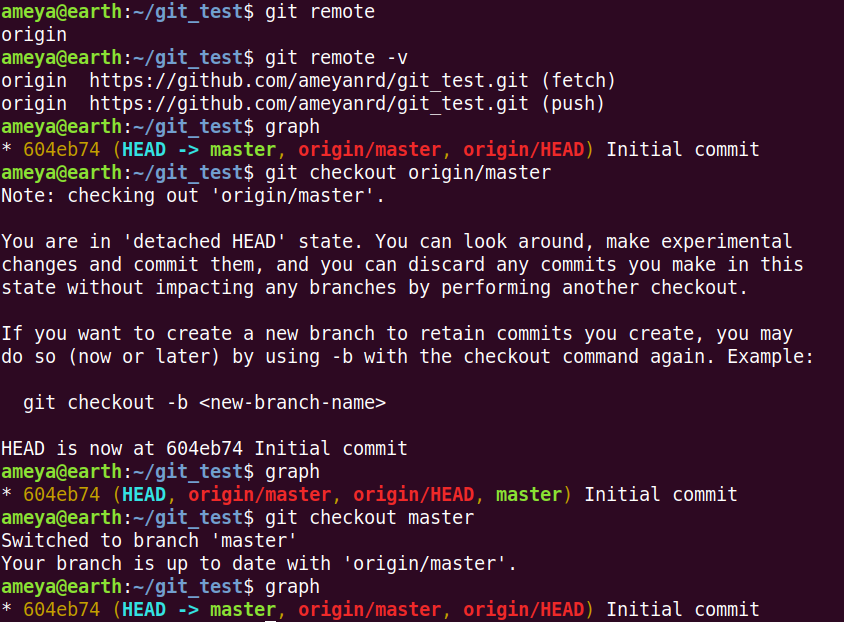
Note: graph is an alias of git log --graph --oneline --all.
git remote shows that one remote named origin is set up. It is the default name created by Git.
git remote -v shows that push and fetch links for origin. We will understand these in a while.
Git graph shows the local master branch. HEAD pointing it indicates that master branch is checked out. Here, we see two new branches origin/master and origin/HEAD.
origin/master branch shows where the remote origin’s master branch is currently.
Similar is origin/HEAD by the above analogy.
When we try to check out these branches, we end up in Detached HEAD state. Here HEAD is on the same commit as origin/master (w.r.t above picture). Here we can check the master branch of origin.
How to update your local repo with the changes done on the remote repo?
To do this, open the git_test repo on GitHub and add a line to README.md and commit your changes.
Now come back to your terminal.
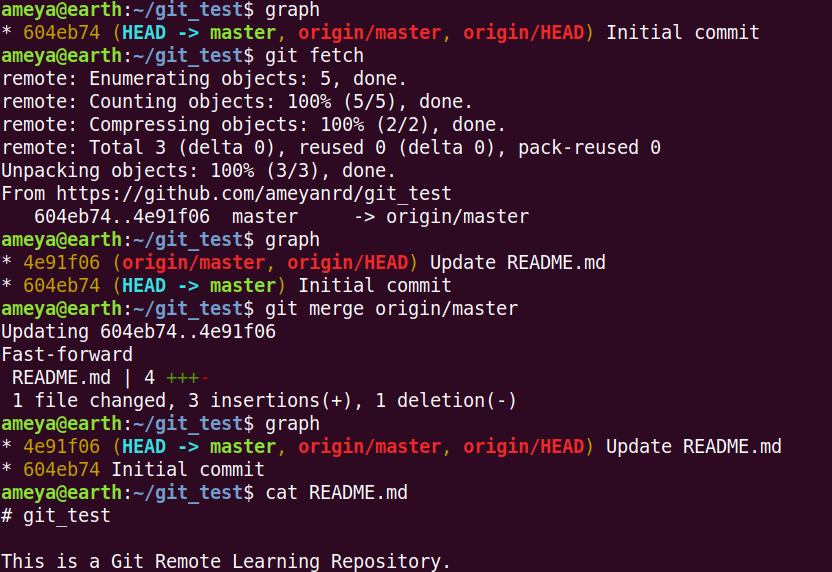
We see that origin/master is still on the same commit on our local system and not in sync with the remote repo. To update it as remote repo, we use
git fetch
Now, we can see origin/master updated.
git merge origin/master helps us to merge our locally checked out master with the master of origin.
These two functions of updating origin/master and merging can be performed by following single command
git pull
Now, we’ll see how to reflect the local changes in the remote repo?
To show this, we create file1, edit it and commit it finally. See the picture below
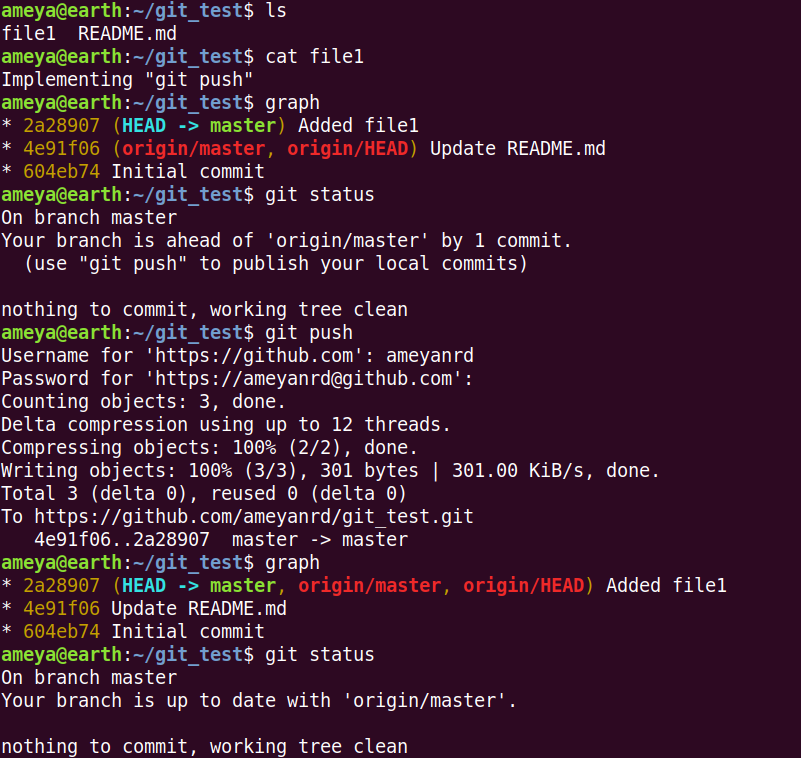
graph and git status both show that master is ahead of origin/master by 1 commit.
git push will push the local changes to the remote repo. Here, you will see that user authentication is required. This checks whether the person is authorised to make changes to the remote repo.
Go to your GitHub account and check that the implemented changes.
Note: These fetch and push commands use the links we saw in git remote -v.
Note: Here we have only one remote set in our local repo, i.e. origin. Thus, we didn’t mention the remote and the branch explicitly. Generally, we run the following type of commands
git fetch <remote> <branch>
(E.g., git fetch origin master in our case)
git pull <remote> <branch>
git push <remote> <branch>
Now, let’s move on to setting more remotes.
Why would it be required to set more than one remotes?
Say you want to contribute to a project or maybe provide come changes for a project hosted on GitHub and you don’t have the edit access. How would you do it?
Generally, for such kind of activity, we copy this file to our GitHub account. This process is called making a fork. Later, we clone this forked repo in our local system.
So, now we have one original repo, a forked repo on our GitHub account and a cloned repo of our fork.
By default, origin will be created for this forked repo in our local repo. But if we want to check the changes implemented at the original repo (from which we forked), we add this as our another remote (generally named as upstream).
For contributing to the project, we create another branch on our local repo, implement the changes and push them to our forked version. Later we create a Pull Request on GitHub.
A Pull Request sends the owner of the file a request of verifying the changes and merging them with their master branch.
Later, if that owner merges our branch with the master, we delete the branch we created on our local system and pull the changes from upstream/master and continue our work.
See below picture for adding upstream.
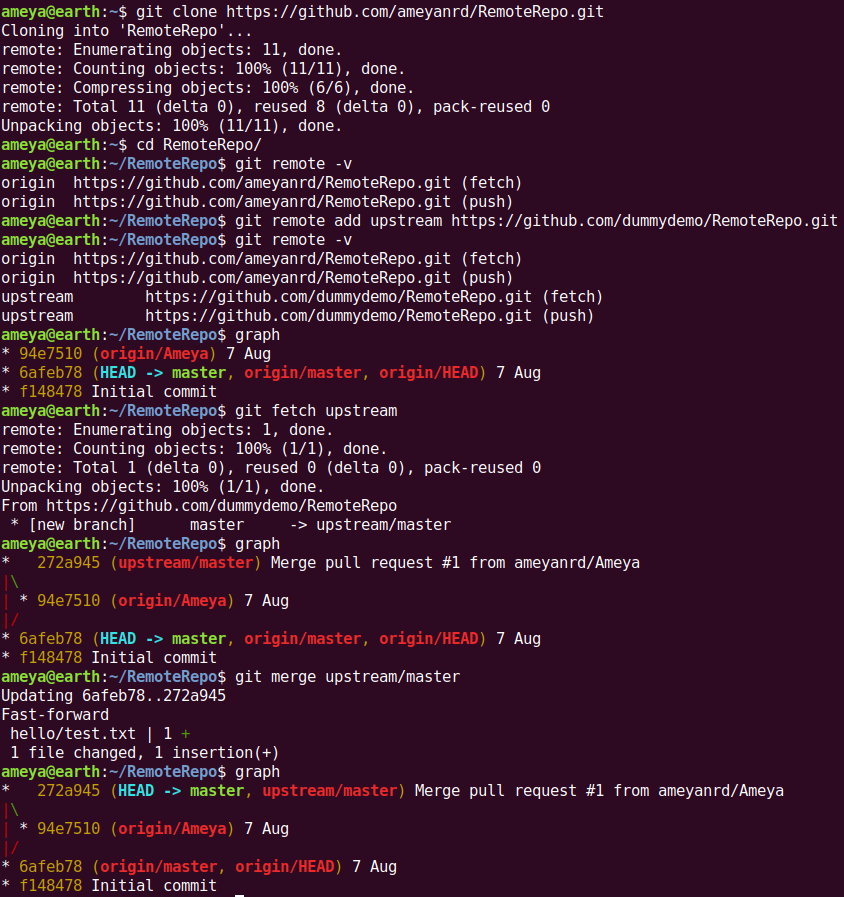
I have created a dummy account named dummydemo and created a repo called RemoteRepo. We will this repo as original repo and fork it to our account and later clone it to our pc.
We see origin as our own account fork. We add upstream to check the changes at dummydemo/RemoteRepo using
git remote add <remote-name> <remote-link>
Git graph shows that still, it’s branches are not updated. So we use
git fetch upstream
and merge it with our local master.
To remove a remote, we can use
git remote remove <remote-name>
Task: Create a new branch on our local
RemoteRepo, make some changes and push this branch toorigin(pushing toupstreammight not be possible as we might not have the edit access). Now, make aPull Requesttodummydemo/RemoteRepoon GitHub.dummydemocan verify your changes and merge these to themasterbranch.
Resources:
- https://git-scm.com/book/en/v2
- https://github.com/PointCloudLibrary/pcl/wiki/A-step-by-step-guide-on-preparing-and-submitting-a-pull-request
- https://www.atlassian.com/git/tutorials/rewriting-history/git-rebase
- https://www.atlassian.com/git/tutorials/rewriting-history
- https://www.perforce.com/blog/vcs/how-use-git-hooks
- https://spin.atomicobject.com/2016/06/26/parallelize-development-git-worktrees/